“You really are a chameleon, aren’t you? Fitting in wherever you go.”
Suzanne Palmieri
Progressive Web Applications (PWA) have been around since 2015 when the term was first coined by Frances Berriman and Alex Russel. Pundits have opined their need, use, and implementation in the years since the concept was first introduced. Many saw PWAs as a solution to solve the problem of providing a rich cross-platform mobile app user experience. But with the advent of Flutter and other cross-platform mobile frameworks, this approach might seem like a less appealing solution. So why is PWA interesting to Flutter developers?
I can’t speak for every Flutter developer, but I find the idea of building a PWA in Flutter to complement a mobile app intriguing. A Flutter PWA can potentially attract more users to view and consider a mobile app with a lower barrier to download and try the app. Since a Flutter PWA is a web app, the URL to the PWA can be easily distributed and viewed in any web browser. The PWA can be created from the same set of widgets and code base as the mobile app. The PWA can include select or complementary elements of the mobile app to either entice new users to get the mobile app, provide additional information or content to existing mobile users, or a combination of both. The PWA can also provide users with a link to easily install the mobile app from the Apple App Store or Google Play Store.
In this post, I’m going to walk through the steps of creating a simple Flutter web app that can be used as the basis for a Flutter PWA. I will show how to create a GitHub repository with the Flutter web app that will use GitHub Pages to host the web app for zero cost. Finally, I’ll show how to use GitHub Actions to continuously integrate changes pushed to the GitHub repository.
Prerequisites
To follow along with this post and create your own GitHub hosted Flutter PWA, you will need to have Flutter installed on your computer and a GitHub account. To install Flutter, go to the Flutter website and follow the “Get started” documentation. To get a free GitHub account, go to github.com and sign up for the Free plan.
I’m using Visual Studio Code on macOS for my development environment. As such, the keyboard shortcuts, editor, and OS references will be associated with my environment but should be easy to translate to other Flutter development environments.
Environment Set-up
At the time of writing this post, Flutter Web is in beta, so to use the Flutter Web components, the Flutter channel must be set to beta. In VS Code, open the terminal window (control-~) and check the current Flutter channel.
$ flutter channel
Flutter channels:
  master
  dev
  beta
* stable
Switch to the beta channel if it’s not the currently selected channel.
$ flutter channel beta
Switching to flutter channel 'beta'...
git: ...
A Flutter upgrade should always be performed when switching between Flutter channels to make sure the Flutter code on that channel is current.
$ flutter upgradeFinally, configure Flutter to enable web development support.
$ flutter config --enable-web
Setting "enable-web" value to "true".
For a quick confirmation that Flutter has enabled web development support, run the Flutter devices command. If web development support is enabled, the Chrome browser and Web Server will be listed as connected devices recognized by Flutter.
$ flutter devices
2 connected devices:

Chrome        • chrome                 • web-javascript • Google Chrome 80.0.3987.116
Web Server    • web-server             • web-javascript • Flutter Tools
Flutter PWA
I like to believe that software developers should be resourceful. I try to avoid re-inventing the wheel when an acceptable solution already exists. For the Flutter web app, I’m leveraging the code from a set of three Flutter web app tutorials created by Dane Mackier at FilledStacks.
- Create and Deploy a Flutter Web App – Part 1
- Building a Responsive Website using Flutter – Part 2
- Template Layouts and Navigation in Flutter Web – Part 3
In his tutorials, Dane walks the user through building a responsive web app using Flutter. While not necessary for this exercise, I highly recommend watching the videos and reading the associated posts for the tutorials to understand the code.
I’ve created a repository on GitHub with the code from Dane’s tutorials with a couple of minor modifications. At the end of part 1, Dane walks the reader through hosting the web app on Firebase. While this is an acceptable solution for many readers, I chose to use GitHub as my hosting solution for this exercise. Using GitHub and GitHub Pages, the Flutter PWA will have source code management, web hosting, and continuous integration from a single provider. I removed the Firebase related files as well as made a few minor changes for this exercise.
The project code that will be the baseline for the Flutter PWA is located on GitHub. We’re going to fork this project into our GitHub account and rename the repository so GitHub Pages will recognize and host the PWA.
First, click on the following link flutter_pwa_baseline to bring up the repository with the Flutter PWA baseline project. If you’re not logged in to your GitHub account, log in now as must be logged in to GitHub to fork a repository.
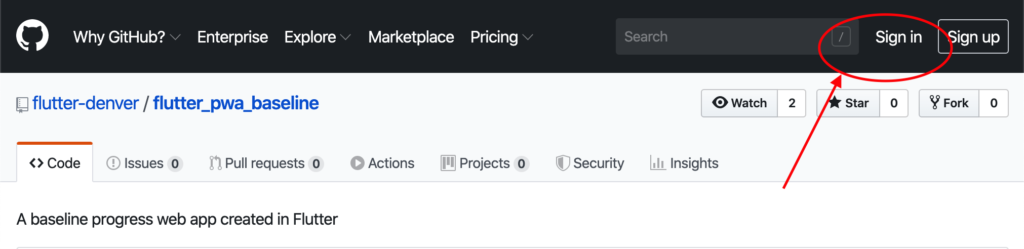
To create a copy of the Flutter PWA baseline repository, click on the “Fork” button on the upper right-hand side of the repository window. GitHub will generate a copy of the project in your account.

Configuring for GitHub Pages
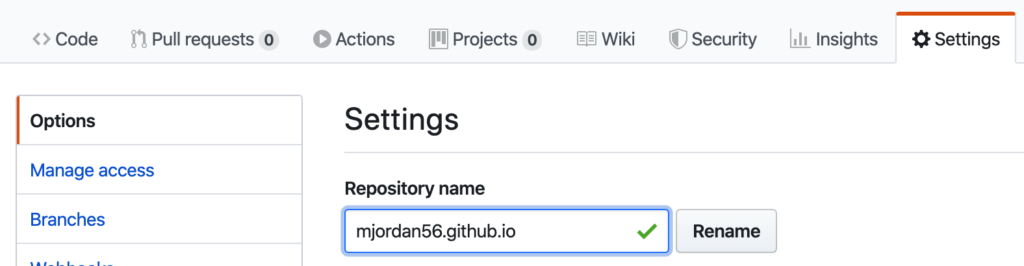
For GitHub Pages to recognize the Flutter PWA baseline repository as a web app to host, we need to rename the repository to conform to GitHub Pages naming convention. To rename the repository, click on the “Settings” tab for the new flutter_pwa_baseline project.

Change the repository name to {your account name}.github.io. GitHub Pages supports a single user or organization site plus individual project sites. For this exercise, we’re creating a single user or organization site. For most people, this will be a website for experimenting with Flutter web and, as such, will be a single user site. In my case, my single-user site is my GitHub account name, mjordan56, followed by the github.io postamble, i.e., mjordan56.github.io. For more information on GitHub Pages, consult the GitHub Pages documentation.
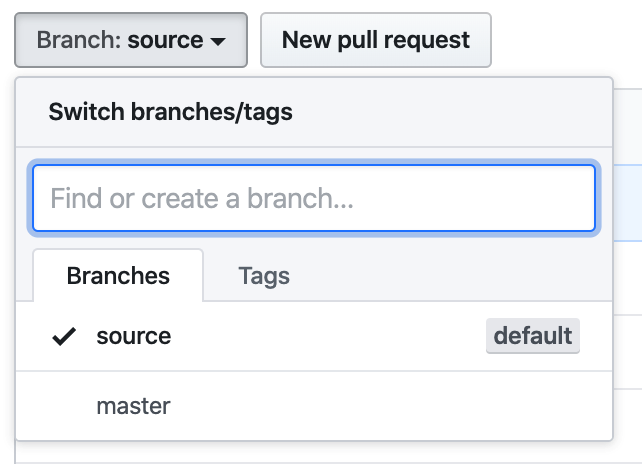
Repository Branches
The Flutter PWA baseline project has two branches, master and source. The source branch is the default branch and has all of the source files associated with the Flutter PWA project. The master branch is initially empty. For a single-user or organization site, GitHub Pages looks at the master branch for the web files to host. For our Flutter PWA, the source files will be managed in the source branch. We’ll create a GitHub Action to watch for changes on the source branch, which will kick off a build of the PWA and populate the master branch with the built PWA.
Generate Access Token
I found a great article on how to publish a Flutter web app to GitHub Pages by onat çipli, Flutter Web — Github Actions-Github Pages. onat shows how to create a Flutter web app and host the built app on GitHub Pages. We’ll follow onat’s instructions with one minor change. Instead of hosting a project web app, we want to host a single-user site.
First, create a personal access token. Go to your GitHub account dropdown menu and select “Settings.” Next, click on “Developer settings” at the very bottom of the column of options on the left side of the window. Then click on “Personal access tokens” from the list of options. Add a short note about what the token is being used for. Then select the repo:status and public_repo flags from the repo section.
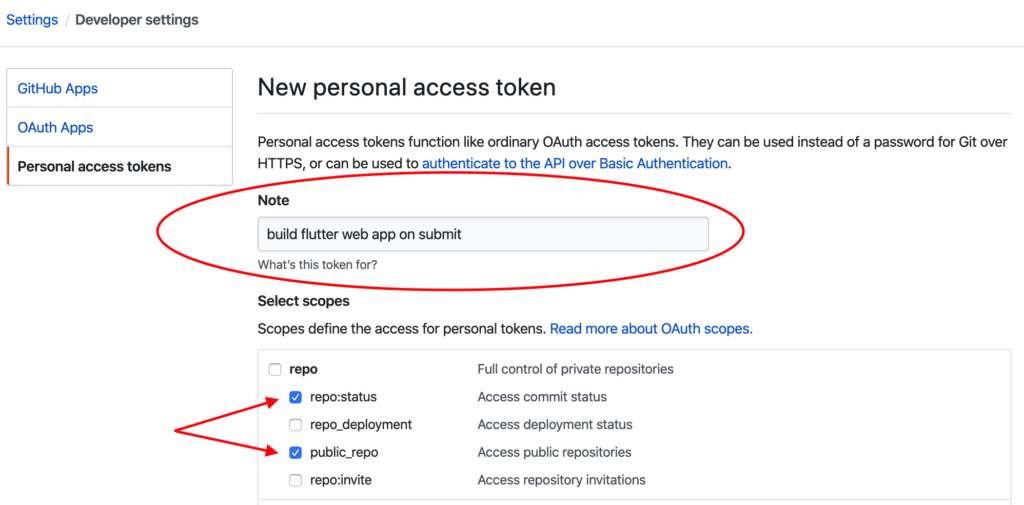
Scroll to the bottom of the window and click on the “Generate token” button. Copy and save the generated token! The token is needed in the next step.

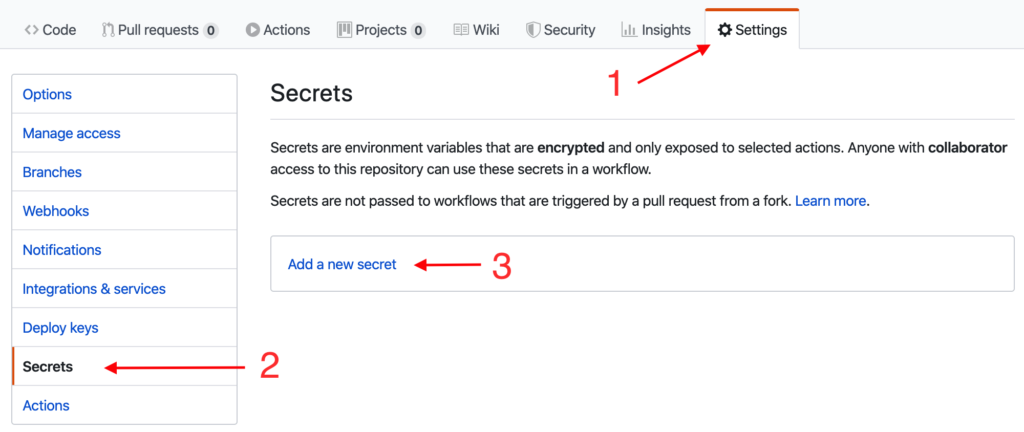
The personal access token needs to be stored in the secrets for the PWA repository. Navigate back to your copy of the Flutter PWA baseline repository and click on the “Settings” tab. From the options on the left side of the window, select “Secrets,” then click on “Add a new secret.”
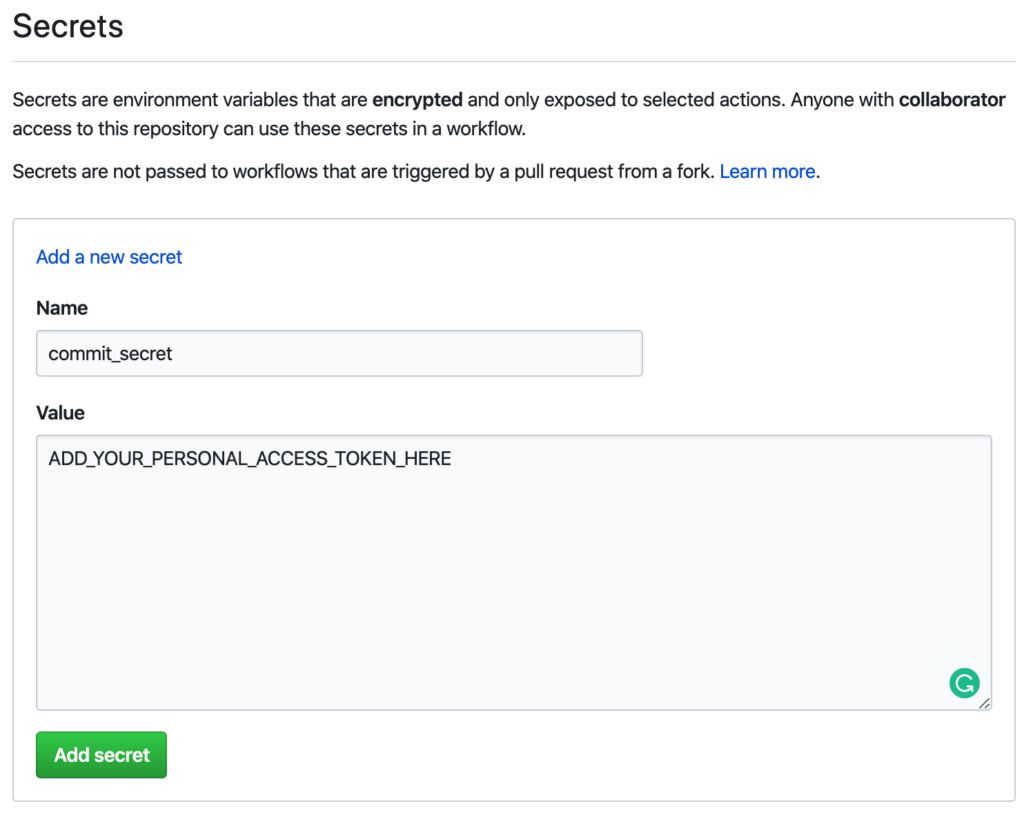
Give the secret the name “commit_secret” and past the generated token into the “Value” field. Click on the “Add secret” button to complete adding the secret to the repository.
Create GitHub Action
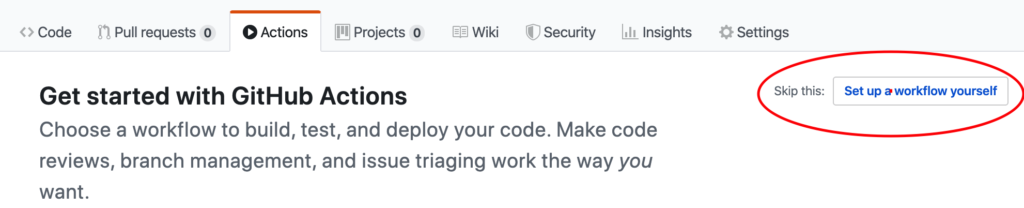
Now that the commit secret access token is in place, the GitHub Action to build the PWA can be created. Click on the “Actions” tab, then click on “Set up a workflow yourself.”
This will open an editor for creating the build and publish workflow action. First, give the workflow action file an appropriate name. I’d recommend pwa_build_publish.yml.
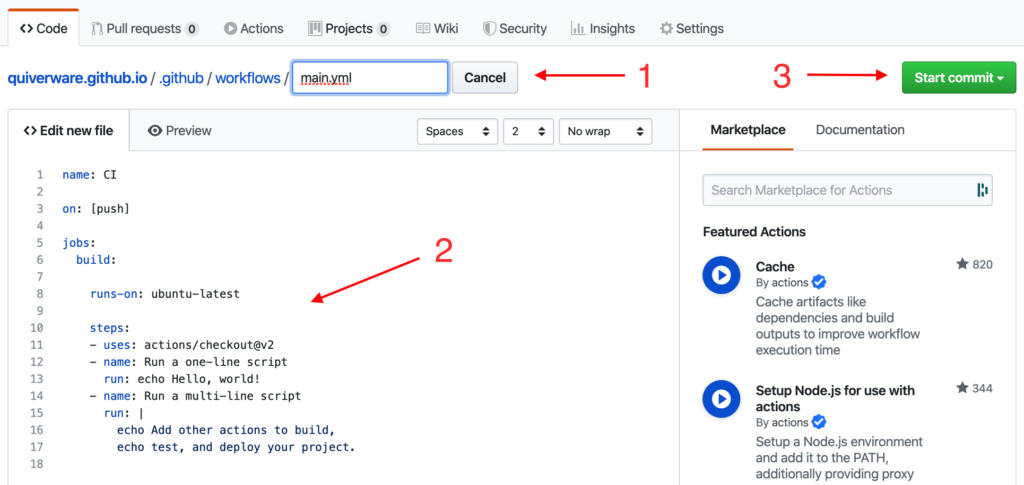
Next, replace the default text in the file with the workflow listed below and make the following changes to the workflow for your repository:
- Uncomment line 28 by removing the “#’ character at the beginning of the line and replace the placeholder token REPLACE_WITH_YOUR_EMAIL_ADDRESS with your email address. This is the email address used by Git to notify a Git error has occurred.
- Uncomment line 29 and replace the placeholder token REPLACE_WITH_YOUR_NAME with your name. This is the name used by Git when referencing the user implementing the Git commands.
- Delete line 31. Uncomment line 32 and replace the two placeholder tokens YOUR_ACCOUNT_NAME in the GitHub remote URL with your GitHub account name. My GitHub account name is mjordan56, and the GitHub Pages single user site repository I created is mjordan56.github.io, so my GitHub remote URL is github.com/mjordan56/mjordan56.github.io.git.
After completing the changes to the workflow, click on the “Start commit” button at the upper-right of the window. This will execute a Git commit and check the workflow file into the source branch of the repository. If the workflow needs to be modified in the future, the file can be found in the .github/workflows directory of the repository.
Since the workflow file is being committed and pushed to the source branch, GitHub Actions will execute the new workflow and kick off a build of the Flutter PWA and pushed the built web components to the master branch. GitHub Pages, in turn, will see the web app and host it on the internet. If everything built and published successfully, the new Flutter PWA can be viewed in a browser at {your account name}.github.io.
That’s it! Congratulations, you’ve just created your very own Flutter PWA hosted by GitHub Pages all at zero cost to you. Now the fun part begins. What are you going to do with your new PWA? The current PWA is a barebones minimum implementation with lots of unimplemented features. The hamburger menu isn’t connected, the navigator stack isn’t quite right, the content is uninteresting, and so much more needs to be done. And now I turn the keys over to you. I highly recommend watching Dane Mackier’s three-part video tutorial and read the accompanying web pages for the tutorials to understand the layout and organization of the code. Pay close attention to the routes and navigation widgets. I believe there is room for lots of improvement in this code. I’m considering writing another post focusing on just the route and navigation widgets.
I’d like to thank Dane Mackier, and onat çipli for their articles on Flutter web that helped me build a PWA hosted on GitHub.
References
- Flutter “Get started“
- GitHub account
- GitHub Pages documentation
- FilledStacks Flutter Web Tutorials by Dane Mackier
- Flutter Web — Github Actions-Github Pages by onat çipli
- Progressive web application – Wikipedia
- Your First Progressive Web App – Google Developers Code Labs
- 4 important points to know about Progressive Web Apps (PWA) – medium.com
- What are Progressive Web Apps? – web.dev
- What makes a good Progressive Web App? – web.dev
- What is a PWA – An Intro to Progressive Web Apps – blockchainsimplified.com